Sunday enthu-cutlet-ness put to use in making mini Dream-catchers. :D
(Disclaimer: I failed miserably the first few times till I finally got a hang of the weaving. Therefore, I suggest keep chocolate and your favourite music handy. Good company and occasional help from Pinterest also worked for me. Perseverance, my friend, is the key.)
So, here is a step-by-step with pictures of how you can make these gorgeous little things.
STEP ONE: Gathering materials:
I pretty much used Jugaad throughout. There are only three to four materials required:
1) Any sturdy hoop. (You can use wire to make your own. Make sure to cover it up with lace, so it looks pretty.)
2) String/ Thread (a needle may come handy)
3) Feathers and Beads to decorate.

STEP TWO: Weaving the web:
(Step two originally is making the hoop, but since I had a ready-made one, I am skipping it. You can use Step two on this webpage to create one from scratch)
1) Imagine you are a spider. I read it on YouTube and trust me, it helps. :D
2) Now, choose a point on the hoop and tie one end of the string in a knot. Stretch the string to another point and loop it around the hoop - you can refer to the picture below. It is prefered that you do this in a clock-wise direction.
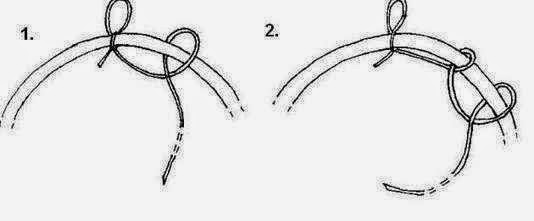
Keep doing this till the entire circle ends. Make sure that the points are equidistant from each other. At the end of this step, my bangle cum dream-catcher looked like this:

3) Continue weaving the web by making loops on the the base strings. The loop needs to be in the center of the base string. You can have as many rounds of loops on your web. The tiny loops might need you to use a needle to pull the thread in and out.

4) Insert a bead into the thread and secure it by knotting it properly. I suggest double-knotting, to be on the safe side. And with that, your base is ready.

Ta-da! The spidey thing helped, didn't it?! :D
STEP THREE - Decorating the Dream-catcher:
According to folklore, feathers are used to decorate it. I picked up old feather earrings to get my job done. You need to attach the feather and one point of the base to either ends of a string and you can use multiple feathers. I used only one, and here is how mine turned out.

However, you can use ANYTHING to decorate it. Go crazy, my friend. I checked a couple of pictures on Google, and there were wacky ideas. One of them was an earring holder. I might try my hands on that one, the next time.
I made two more and actually decorated one of them only with beads. The blue one remains my favorite, the colors just seemed to blend in!

I hope this was of help. Thank you for stopping by. : )
3 comments:
Such a beauty...i will definitely try :D
enthu-cutlets are the best artists ;) this looks gorgeous! thanks for the inspiration
You guys, SO glad you liked it! :D
Post a Comment